


Introduction
Ansible is a super cool tool that I’ve used a lot, especially when I ran things on-prem. At that time, I used it mostly for provisioning and updating 100+ machines at once.
What is Ansible?
Ansible is a configuration management and orchestration tool that allows users to automate the deployment and configuration of applications, systems, and infrastructure. It uses a simple, human-readable language called YAML to define tasks and configurations, which are then executed on remote servers over SSH.

One of the main advantages of Ansible is that it is easy to use and requires no special coding skills. It also has a large and active community, which means there are many resources available for users to learn from and troubleshoot with.
Ansible can be used for a wide range of tasks, including installing and configuring applications, managing systems and infrastructure, deploying code, and much more. It is often used in conjunction with other tools, such as version control systems and continuous integration/continuous delivery (CI/CD) platforms, to automate the entire software development and deployment process.
Installation of Ansible on RHEL8
To install Ansible on Red Hat Enterprise Linux 8, you can use the following steps:
- Add the EPEL (Extra Packages for Enterprise Linux) repository to your system. This repository contains additional software packages that are not included in the default Red Hat repositories. To add the EPEL repository, run the following command:
sudo dnf install epel-release
- Install the
ansiblepackage using thednfpackage manager. This will install Ansible and all of its dependencies:
sudo dnf install ansible
- Verify that the installation was successful by checking the version of Ansible:
ansible --version
You should see output similar to the following:
ansible 2.9.16
  config file = /etc/ansible/ansible.cfg
  configured module search path = ['/home/user/.ansible/plugins/modules', '/usr/share/ansible/plugins/modules']
  ansible python module location = /usr/lib/python3.8/site-packages/ansible
  executable location = /usr/bin/ansible
  python version = 3.8.8 (default, Aug  5 2020, 21:55:34) [GCC 10.2.1 20200726 (Red Hat 10.2.1-1)]
That's it! Ansible should now be installed on your Red Hat Enterprise Linux 8 system.
Basic Architecture of Distributed Ansible Cluster :
The basic architecture of a distributed Ansible cluster consists of a few key components:
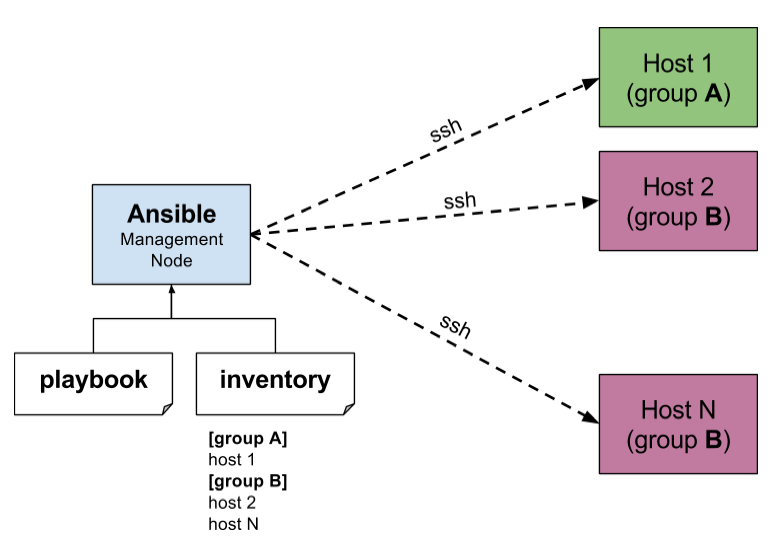
Ansible Controller: This is the central node in the cluster that is responsible for managing the entire infrastructure. The Ansible controller sends out commands to the managed nodes and receives responses from them.
Managed Nodes: These are the nodes that are being managed by the Ansible controller. The managed nodes can be servers, workstations, or any other type of device that can be managed by Ansible.
Inventory: The inventory is a list of all the managed nodes in the cluster, along with their IP addresses and any other relevant information. The Ansible controller uses the inventory to determine which nodes to send commands to and to gather information about the nodes.
Playbooks: Playbooks are YAML files that contain a series of tasks that Ansible should execute on the managed nodes. The Ansible controller reads the playbooks and sends the tasks to the appropriate managed nodes to be executed.
Modules: Modules are small programs that are used by Ansible to perform specific tasks on the managed nodes. For example, there might be a module for installing software, configuring networking, or managing users and groups.
Plugins: Plugins are extensions to Ansible that allow it to interact with different types of systems or technologies. For example, there might be a plugin for interacting with cloud services or for managing containers.
In a distributed Ansible cluster, the Ansible controller and the managed nodes communicate with each other using the SSH protocol. The Ansible controller sends commands to the managed nodes, which execute the tasks and send back the results. This allows the Ansible controller to manage the entire infrastructure from a single central location.
The Inventory
The inventory in Ansible is a list of managed nodes that are being controlled by the Ansible controller. It specifies the hostnames or IP addresses of the managed nodes, along with any other relevant information such as the user to use for SSH connections, the SSH port to use, and any variables that should be associated with the nodes.
The inventory can be stored in a variety of formats, including plain text files, INI files, and YAML files. The most common format is a plain text file, which lists each managed node on a separate line, with optional variables specified using the key=value format.
Here is an example of a simple inventory file in plain text format:
web1 ansible_host=192.168.1.100
web2 ansible_host=192.168.1.101
db1 ansible_host=192.168.1.102
This inventory file specifies three managed nodes: web1, web2, and db1. The ansible_host variable specifies the IP address of each node.
You can use the ansible-inventory command to view and manipulate the inventory. For example, to view the inventory in a human-readable format, you can run the following command:
ansible-inventory --list
You can also specify a different inventory file using the -i option:
ansible-inventory -i /path/to/inventory.ini --list
The inventory is an important part of Ansible because it specifies which managed nodes the Ansible controller should communicate with. When you run a playbook, Ansible will use the inventory to determine which tasks should be executed on which nodes.
Ad Hoc
In Ansible, ad hoc mode allows you to execute simple one-off tasks on managed nodes without writing a playbook. Ad hoc tasks are useful for quick and easy automation tasks, such as installing software, creating users, or rebooting servers.
To use ad hoc mode in Ansible, you use the ansible command followed by the name of the managed nodes you want to run the task on, and the task you want to execute.
Here is an example of using ad hoc mode to install the htop package on all managed nodes in the webservers group:
ansible webservers -m yum -a "name=htop state=present"
In this example, the -m option specifies the module to use (in this case, the yum module for managing packages on Red Hat-based systems), and the -a option specifies the arguments to pass to the module (in this case, name=htop state=present to install the htop package).
You can also specify additional options to the ansible command, such as the user to use for SSH connections, the SSH port to use, and any variables you want to pass to the task.
Ad hoc mode is a convenient way to perform simple tasks quickly and easily, but it is not well-suited for more complex tasks or for tasks that need to be executed multiple times. For these tasks, you should use playbooks instead.
Playbook
In Ansible, playbooks are written in YAML and contain a series of tasks that Ansible should execute on managed nodes. Playbooks are more powerful and flexible than ad hoc mode, and are the preferred method for automating complex tasks or tasks that need to be executed multiple times.
Here is a simple example of an Ansible playbook that installs the ntp package and starts the ntpd service on all managed nodes:
---
- hosts: all
  tasks:
    - name: Install ntp package
      yum:
        name: ntp
        state: present

    - name: Start ntpd service
      service:
        name: ntpd
        state: started
        enabled: true
In this example, the hosts field specifies the managed nodes that the playbook should be applied to (in this case, all to apply the playbook to all managed nodes). The tasks field is a list of tasks to be executed, each with a name and a module to be used (in this case, the yum module to install the ntp package and the service module to start the ntpd service).
To run a playbook, you use the ansible-playbook command followed by the path to the playbook file:
ansible-playbook /path/to/playbook.yml
You can also specify additional options to the ansible-playbook command, such as the inventory file to use, the user to use for SSH connections, and any extra variables you want to pass to the playbook.
Playbooks are a powerful and flexible way to automate tasks in Ansible, and are an essential part of using Ansible for infrastructure management.
Here are a few important terms and concepts to consider when writing an Ansible playbook
Modules: Modules are small programs that are used by Ansible to perform specific tasks on managed nodes. For example, there are modules for installing software, configuring networking, and managing users and groups.
Variables: Variables allow you to parameterize your playbooks and templates, making them more flexible and easier to reuse. You can define variables in your playbook or in external files, and use them to customize the behavior of your tasks.
Conditionals: Conditionals allow you to specify that a task should only be executed if a certain condition is met. For example, you might want to install a package only if it is not already present on the managed node.
Loops: Loops allow you to execute a task multiple times, either over a list of items or until a certain condition is met. This can be useful for tasks that need to be performed on multiple managed nodes or for tasks that need to be repeated multiple times.
Handlers: Handlers are tasks that are triggered by other tasks, typically when a certain condition is met. For example, you might want to restart a service only if its configuration has been changed.
Tags: Tags allow you to group tasks together and execute them as a single unit. This can be useful for organizing your playbooks and for executing only specific tasks when running a playbook.
Templates: Templates are files that contain configuration settings or other text, with placeholders for variables. Ansible uses templates to generate configuration files for managed nodes.
By understanding these terms and concepts, you will be able to write more effective and efficient Ansible playbooks.